每个iOS应用程序都有个专门用来更新显示UI界面、处理用户的触摸事件的主线程,因此不能将其他太耗时的操作放在主线程中执行,不然会造成主线程堵塞(出现卡机现象),带来极坏的用户体验。一般的解决方案就是将那些耗时的操作放到另外一个线程中去执行,多线程编程是防止主线程堵塞,增加运行效率的最佳方法:
1.iOS支持多个层次的多线程编程,层次越高的抽象程度越高,使用也越方便,也是苹果最推荐使用的方法。
2.NSThread :是苹果提供的三种方法里面相对轻量级的,但需要管理线程的生命周期、同步、加锁问题,这会导致一定的性能开销。
1.NSThread的初始化
1.初始化:
- (id)initWithTarget:(id)target selector:(SEL)selector object:(id)argument; 参数解析:
- selector :线程执行的方法,这个selector最多只能接收一个参数
- target :selector消息发送的对象
- argument : 传给selector的唯一参数,也可以是nil
简洁的初始化方法:
- 优点:创建线程后自动启动线程
- 缺点:无法对线程进行更详细的设置
+ (void)detachNewThreadSelector:(SEL)selector toTarget:(id)target withObject:(id)argument; [self performSelectorInBackground:@selector(run) withObject:nil];2.线程的启动
NSThread *thread = [[NSThread alloc] initWithTarget:self selector:@selector(run) object:nil]; // 线程一启动,就会在线程thread中执行self的run方法 [thread start];3.其他基本用法
//主线程相关用法 + (NSThread *)mainThread; // 获得主线程 - (BOOL)isMainThread; // 是否为主线程 + (BOOL)isMainThread; // 是否为主线程 //获得当前线程 NSThread *current = [NSThread currentThread]; //线程的名字 - (void)setName:(NSString *)n; - (NSString *)name; 4.线程的状态
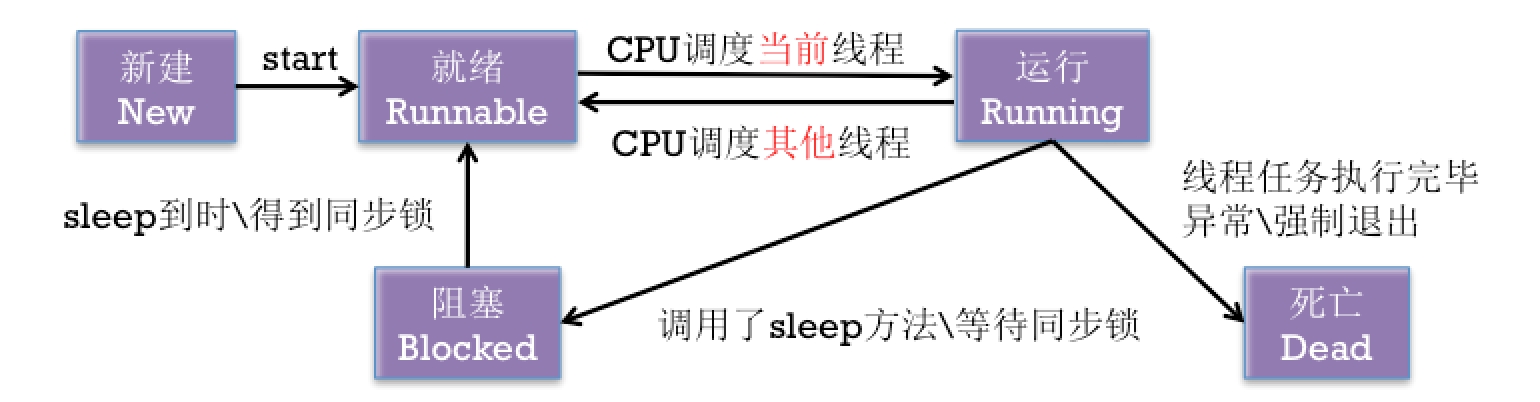
启动线程:
// 进入就绪状态 -> 运行状态。当线程任务执行完毕,自动进入死亡状态 - (void)start; 阻塞(暂停)线程
// 进入阻塞状态 + (void)sleepUntilDate:(NSDate *)date; + (void)sleepForTimeInterval:(NSTimeInterval)ti;强制停止线程
// 进入死亡状态 + (void)exit;注意:一旦线程停止(死亡)了,就不能再次开启任务
5.多线程的安全隐患
资源共享:
- 1块资源可能会被多个线程共享,也就是
多个线程可能会访问同一块资源 - 比如多个线程访问同一个对象、同一个变量、同一个文件
- 当多个线程访问同一块资源时,很容易引发
数据错乱和数据安全问题
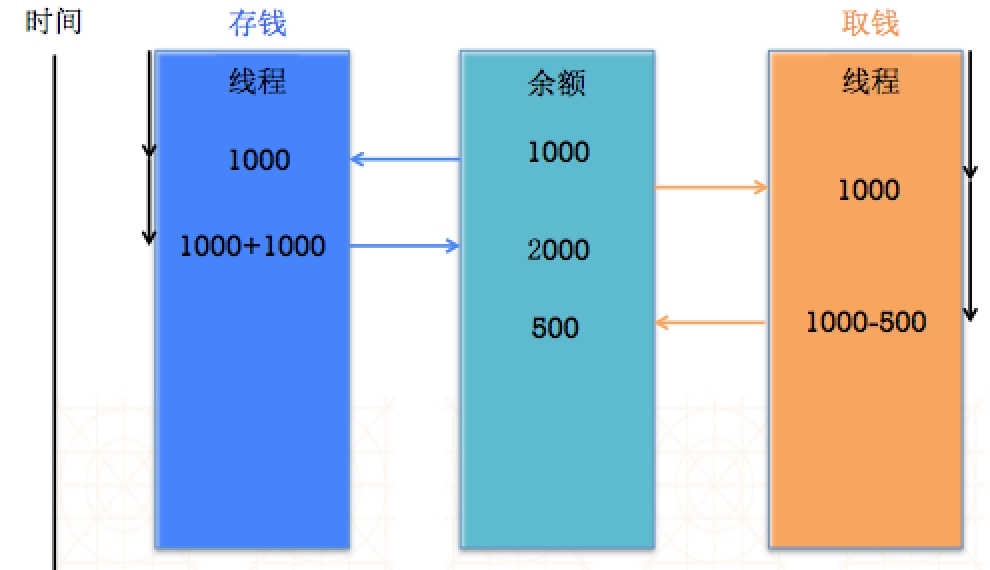
我们可以发现由于多线程的原因,钱变少了,只有500了
安全隐患分析:
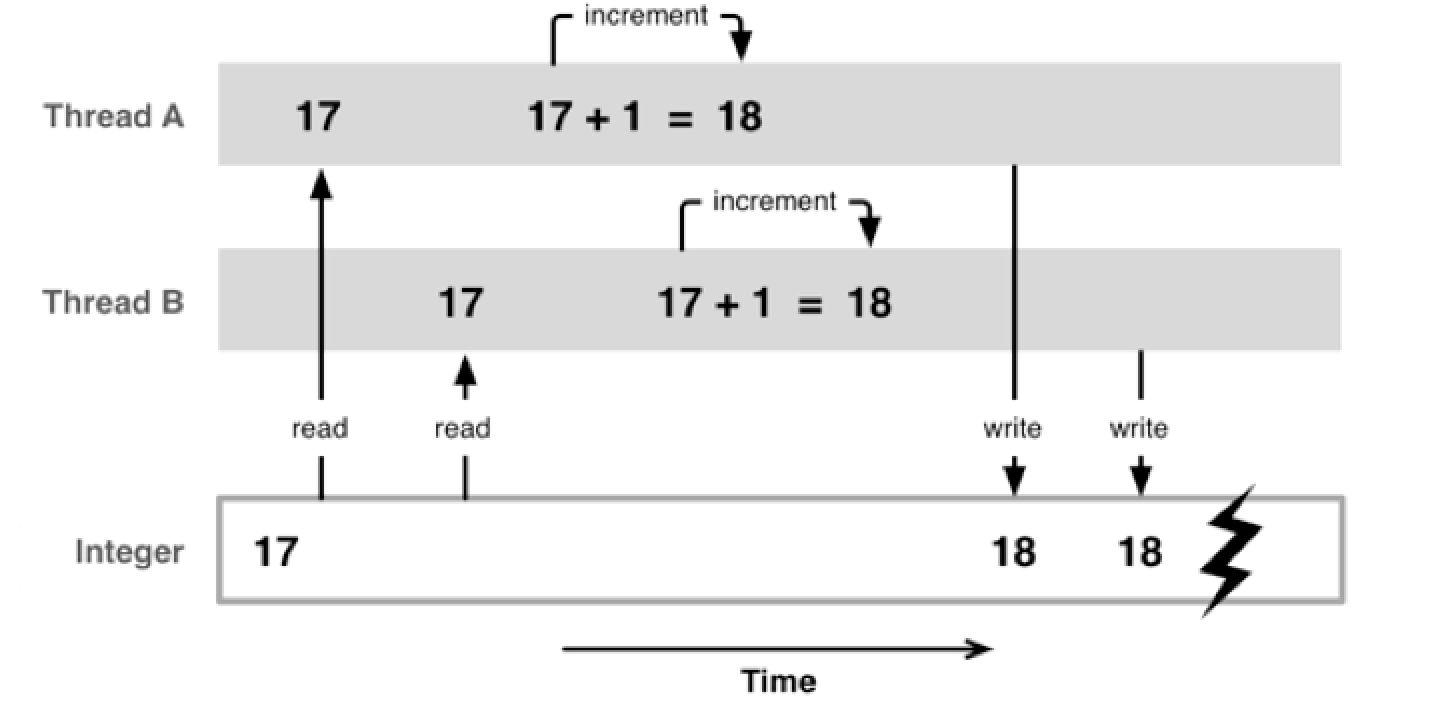
多个线程同时操作一块资源,导致资源更新错误,本来应该是19的,结果却是18.
解决方法:互斥锁
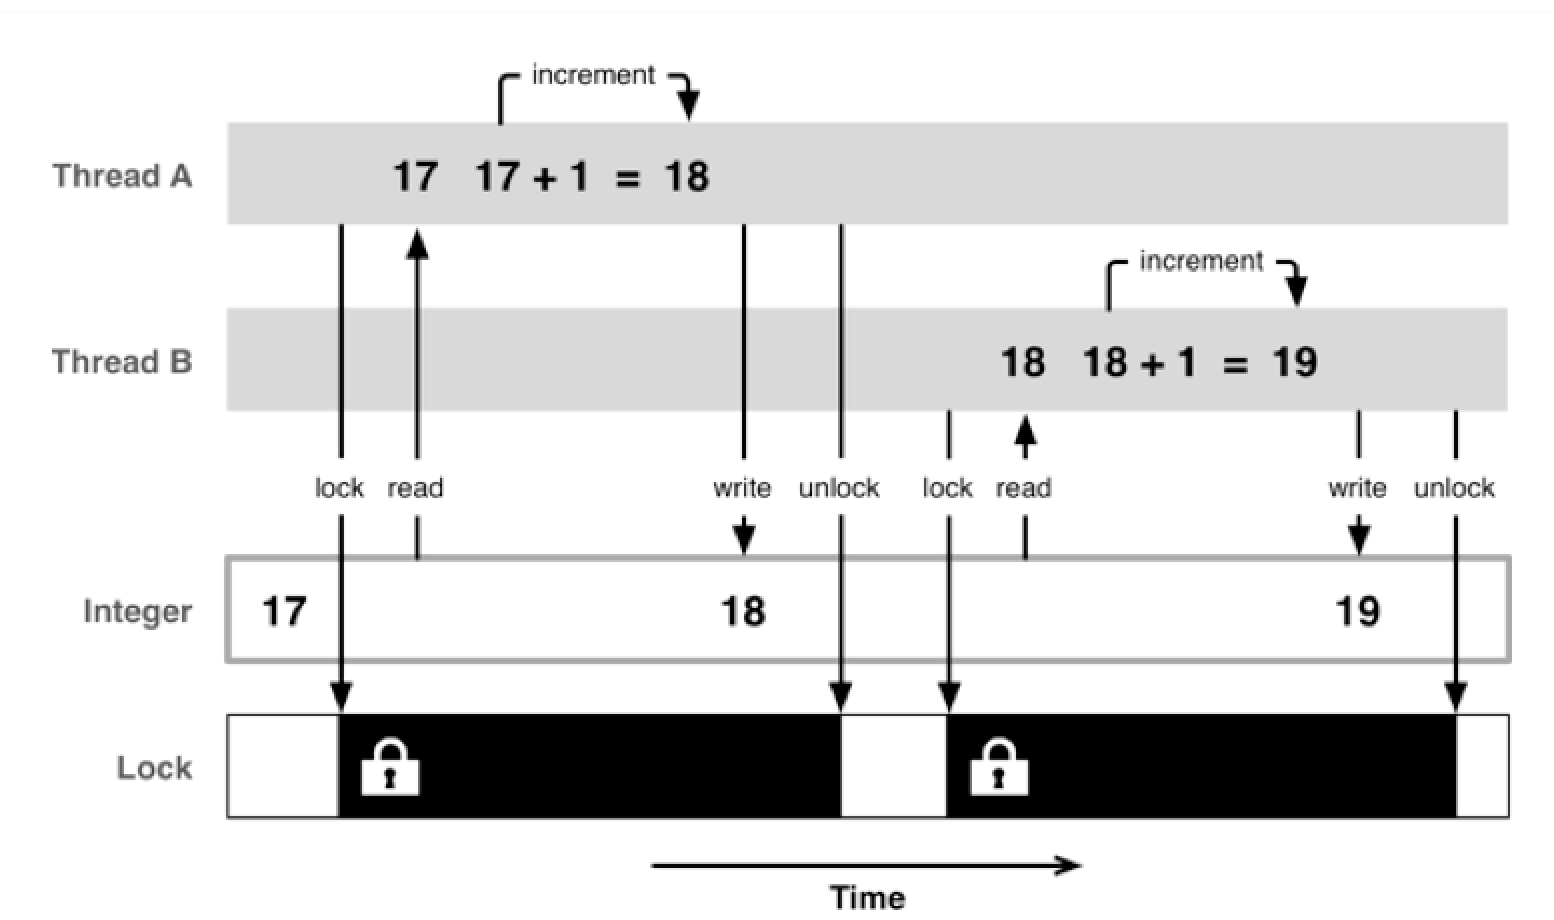
互斥锁很容易理解,当一个线程访问资源的时候,就禁止其他线程访问资源,只有等到该资源被释放才可以。
互斥锁使用格式
@synchronized(锁对象) { // 需要锁定的代码 }
注意:锁定1份代码只用1把锁,用多把锁是无效的
#import "ViewController.h" @interface ViewController () /** 售票员1 */ @property (nonatomic, strong) NSThread *thread1; /** 售票员2 */ @property (nonatomic, strong) NSThread *thread2; /** 售票员3 */ @property (nonatomic, strong) NSThread *thread3; /** 剩余票数 */ @property (nonatomic, assign) NSInteger count; @end @implementation ViewController - (void)viewDidLoad { [super viewDidLoad]; // 0.初始化剩余票数 self.count = 100; // 1.创建3个售票员 NSThread *thread1 = [[NSThread alloc]initWithTarget:self selector:@selector(sell) object:nil]; thread1.name = @"A"; self.thread1 = thread1; NSThread *thread2 = [[NSThread alloc]initWithTarget:self selector:@selector(sell) object:nil]; thread2.name = @"B"; self.thread2 = thread2; NSThread *thread3 = [[NSThread alloc]initWithTarget:self selector:@selector(sell) object:nil]; thread3.name = @"C"; self.thread3 = thread3; } - (void)touchesBegan:(NSSet *)touches withEvent:(UIEvent *)event { // 1.让3个售票员同时开始卖票 [self.thread3 start]; [self.thread2 start]; [self.thread1 start]; } /****************************************************************************************** 只要被@synchronized的{}包裹起来的代码, 同一时刻就只能被一个线程执行 注意: 1. 只要枷锁就会消耗性能 2. 加锁必须传递一个对象, 作为锁 3. 如果想真正的锁住代码, 那么多个线程必须使用同一把锁才行 4. 加锁的时候尽量缩小范围, 因为范围越大性能就越低 5. @synchronized(self.obj)// 锁住 6. 在开发中, 如果要加锁, 一般情况都使用self ******************************************************************************************/ -(void)sell { while (true) { @synchronized(self) { if (self.count > 0) { NSLog(@"count: %ld 售票员:%@",self.count,[NSThread currentThread].name); self.count --; } else { NSLog(@"卖完"); [NSThread exit]; } } } } @end互斥锁的优缺点
优点:能有效防止因多线程抢夺资源造成的数据安全问题
缺点:需要消耗大量的CPU资源
互斥锁的使用前提:多条线程抢夺同一块资源
相关专业术语:线程同步
线程同步的意思是:多条线程在同一条线上执行(按顺序地执行任务)
互斥锁,就是使用了线程同步技术
6.原子和非原子属性
1.OC在定义属性时有nonatomic和atomic两种选择
- atomic:原子属性,为setter方法加锁(默认就是atomic)
- nonatomic:非原子属性,不会为setter方法加锁
2.nonatomic和atomic对比
- atomic:线程安全,需要消耗大量的资源
- nonatomic:非线程安全,适合内存小的移动设备
3.iOS开发的建议
- 所有属性都声明为nonatomic
- 尽量避免多线程抢夺同一块资源
- 尽量将加锁、资源抢夺的业务逻辑交给服务器端处理,减小移动客户端的压力
注意点: atomic系统自动给我们添加的锁不是互斥锁/ 自旋锁
互斥锁和自旋锁共同点:
都能够保证多线程在同一时候, 只能有一个线程操作锁定的代码
互斥锁和自旋锁不同点:
- 如果是互斥锁, 假如现在被锁住了, 那么后面来得线程就会进入”休眠”状态, 直到解锁之后, 又会唤醒线程继续执行
- 如果是自旋锁, 假如现在被锁住了, 那么后面来得线程不会进入休眠状态, 会一直傻傻的等待, 直到解锁之后立刻执行
- 自旋锁更适合做一些较短的操作
7.线程间通信
1.什么叫做线程间通信
- 在1个进程中,线程往往不是孤立存在的,多个线程之间需要经常进行通信
2.线程间通信的体现:
- 1个线程传递数据给另1个线程
- 在1个线程中执行完特定任务后,转到另1个线程继续执行任务
3.线程间通信常用方法:
- (void)performSelector:(SEL)aSelector onThread:(NSThread *)thr withObject:(id)arg waitUntilDone:(BOOL)wait;- 第一个参数:aSelector表示创建的线程的方法
- 第二个参数:thr表示传入的线程
- 第三个参数:arg表示传入线程的方法的参数
- 第四个参数:waitUntilDone的含义:
- 如果传入的是YES: 那么会等到主线程中的方法执行完毕, 才会继续执行下面其他行的代码
- 如果传入的是NO: 那么不用等到主线程中的方法执行完毕, 就可以继续执行下面其他行的低吗
//表示跳转到主线程 - (void)performSelectorOnMainThread:(SEL)aSelector withObject:(id)arg waitUntilDone:(BOOL)wait;4.线程通信实例:
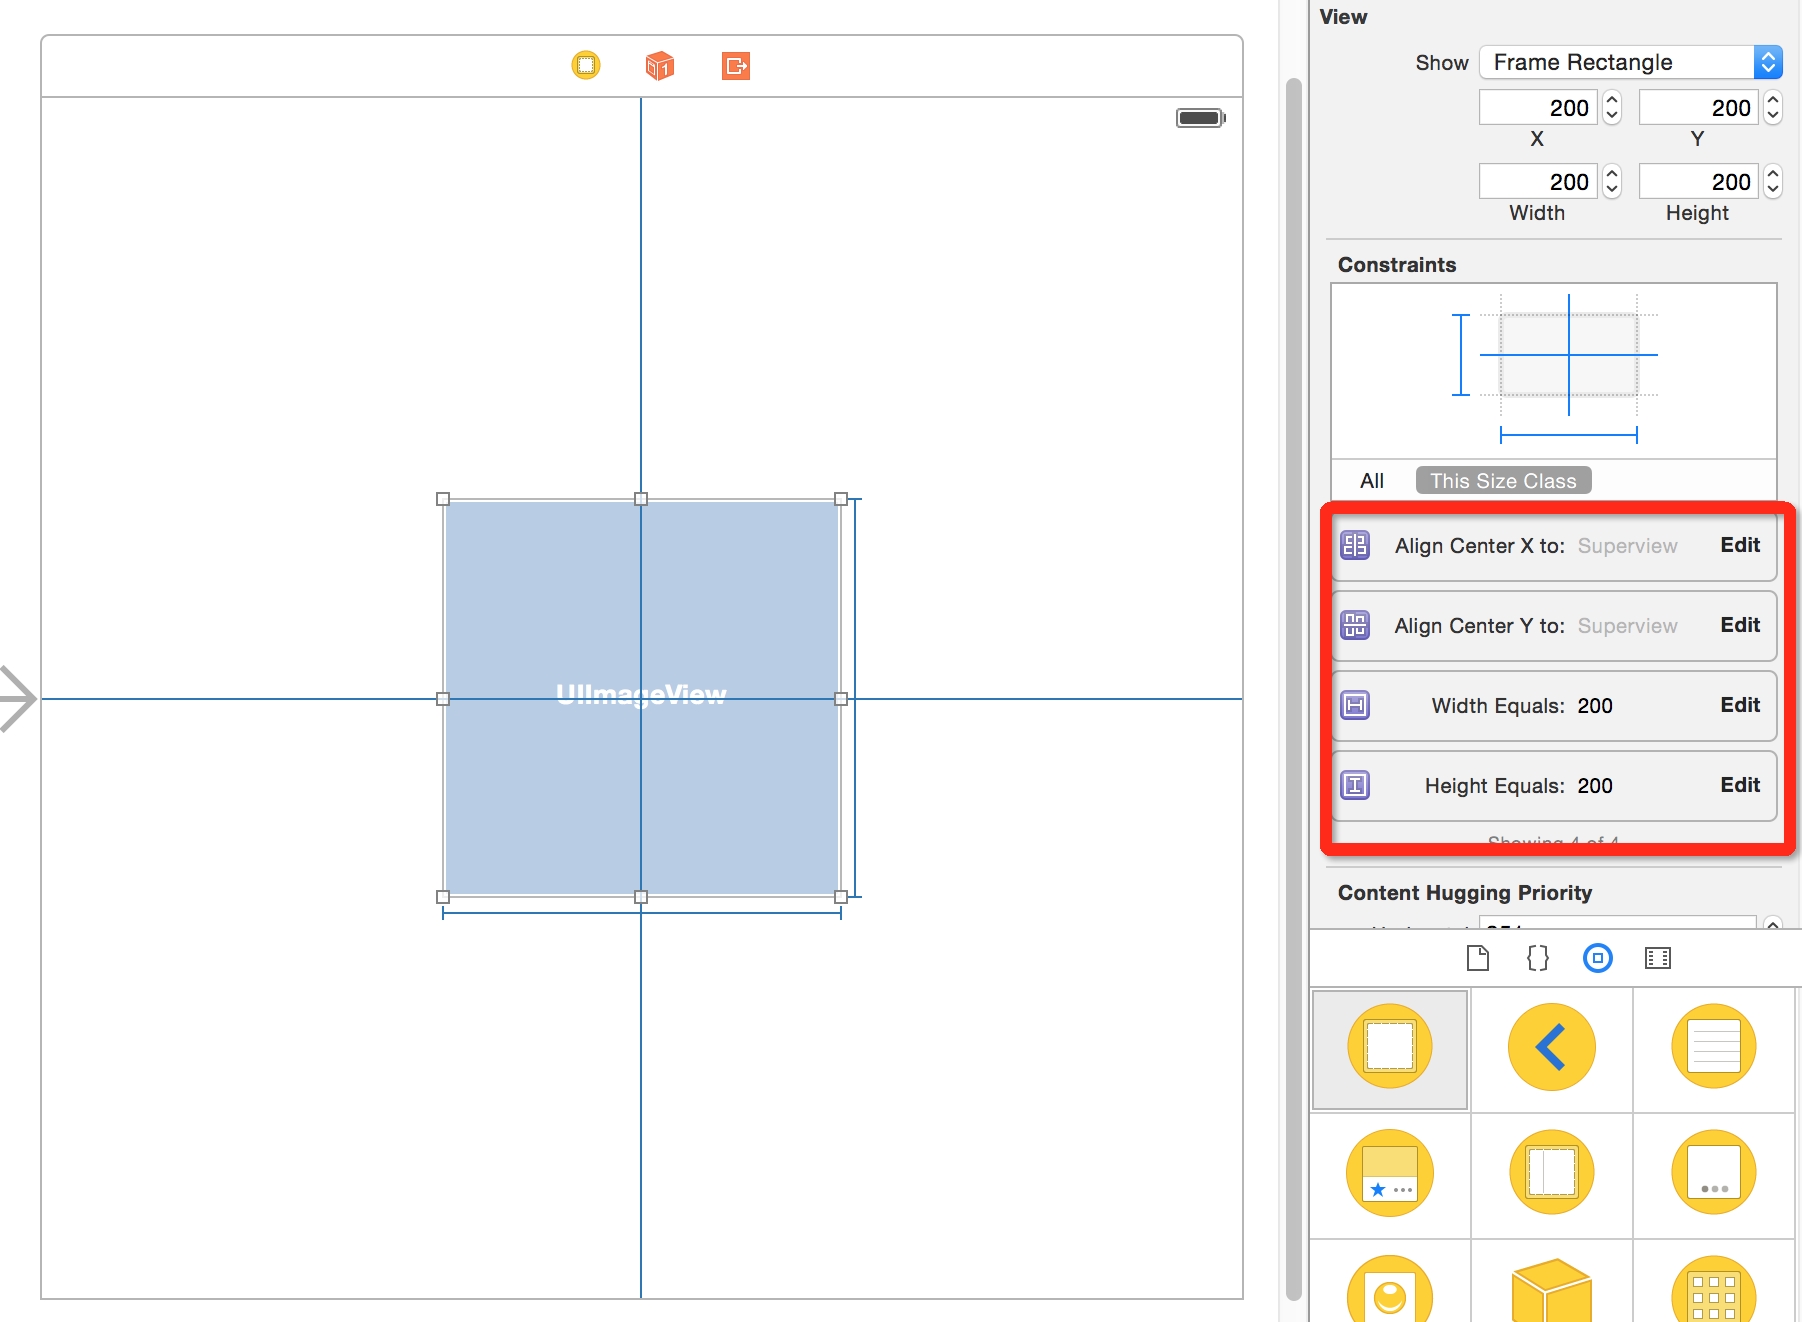
在子线程中下载图片,下载完毕更新主线程的UI
1.在storyboard中设置UIImageView的约束
2.写代码
#import "ViewController.h" @interface ViewController () @property (weak, nonatomic) IBOutlet UIImageView *imageView; @property (nonatomic,strong) NSThread *thread; @end @implementation ViewController - (void)viewDidLoad { [super viewDidLoad]; NSThread *thread = [[NSThread alloc]initWithTarget:self selector:@selector(downloadPic) object:nil]; thread.name = @"downloadImage"; self.thread = thread; } - (void)touchesBegan:(NSSet *)touches withEvent:(UIEvent *)event { [self.thread start]; } -(void)downloadPic { NSString *string = @"http://avatar.csdn.net/7/4/5/1_misakahina.jpg"; NSURL *url = [NSURL URLWithString:string]; NSData *data = [NSData dataWithContentsOfURL:url]; UIImage *image = [UIImage imageWithData:data]; // waitUntilDone的含义: //如果传入的是YES: 那么会等到主线程中的方法执行完毕, 才会继续执行下面其他行的代码 //如果传入的是NO: 那么不用等到主线程中的方法执行完毕, 就可以继续执行下面其他行的低吗 //[self performSelectorOnMainThread:@selector(showPicture:) withObject:image waitUntilDone:YES]; //[self performSelector:@selector(showPicture:) onThread:[NSThread mainThread] withObject:image waitUntilDone:YES]; [self.imageView performSelector:@selector(setImage:) onThread:[NSThread mainThread] withObject:image waitUntilDone:YES]; } - (void)showPicture:(UIImage*)image { self.imageView.image = image; } @end